
INSTALLATION GUIDE
STONE POLYMER COMPOSITE FLOORING(SPC)

1. Tools needed
Utility knife and straight edge
Measuring tape
Shears for cutting around irregular shaped objects
1/4" spacers
2. Planks needed to complete your project
Measure the length and width of your room. If the room has alcoves or offsets, measure these separately. This will give you the square footage of the room. Purchase a minimum of 5% extra to cover mistakes, trimming and for future needs or replacement. Most installations require about 5% overage. However this can vary depending upon the room size and layout.
CAUTION: Do not install SPC FLOORING over carpet and an underlayment is not necessary.
This product is not suitable for any outside use, sunrooms, solariums or saunas. We also highly recommend you do not install in rooms that are not temperature controlled. Exposure to long-term direct sunlight can cause damage to your floor.
3. Installation
CHECK THE PLANKS BEFORE INSTALLING THEM TO BE SURE OF APPEARANCE: We maintain strict quality control at the factory but it is a good idea to check each plank for blemishes or flaws.
CONDITION THE SPC FLOORING PLANKS BEFORE INSTALLATION: The room temperature shall be no greater than 15°C for 24 hrs before, during and after installation. Do not remove the planks from the case during this acclimation period! Maintain this temperature during installation as well.
4. Subfloor preparation
The subfloor surface must be smooth, flat, dry, clean and solid. Carpet staples or adhesive residue must be removed to ensure proper installation. Subfloors should be flat within a tolerance of 1/8" (3 mm) over a span of 4 feet (1,22 m). Any unevenness over 1/8" (3mm) must be sanded down or filled with a floor leveler. Voids or humps in the subfloor will prevent vinyl from locking properly. Subfloors must be carefully checked for moisture problems.
SPC FLOORING is waterproof. It is NOT a water-proofer; any moisture problems need to be addressed prior to installation. New concrete floors need to cure for a minimum of 60 days.
HELPFUL NOTICE: If laying SPC FLOORING over existing ceramic tile, it will be necessary to skim coat the grout lines with a floor leveler. If you install vinyl over an existing floor that has an embossing or grout line on it, you must skim coat with a floor leveler if the embossing or grout line is greater than 1/8" (3 mm).
1. Installation should begin with a corner (right hand side) and proceed from the wall with the tongue facing out away from the wall. Allow a minimum gap of 1/8" (2-3 mm) for subfloor movement or product expansion, which should be covered by accessories. Please make sure you add a t-molding for any rooms greater than 25’ft.
2. When laying the first row in a straight line interlock the short ends by inserting the tongue into the grooves at an angle of about 15° - 20°. Install per sequential plank on the short end (5.75"-15 cm) and be sure to line up evenly. It is of great significance for a wonderful installation.
3. Make sure the seams between the planks are tight. You will feel and hear the click when locking the planks together to create a tight seam. There should be no gap visible between planks. If your seam appears not to be tight, you should immediately pull apart the planks and reinstall. Slowly lift the top plank away from the bottom plank and simply reinstall, repeating step 2.
4. When installing SPC FLOORING, it is strongly suggested to stagger the rows so that the short edge seams are not in a straight uniform line. We advise the staggered rows.
5. To start the second row with the plank in proportion. Measure and mark the plank, then using a straight edge and utility knife, score the plank and snap.
6. Interlock the plank tightly against the first row (long side) again at a 15° - 20° angle. For the next plank, interlock the short side first, leaving it slightly away from the long side and then slide into the long side.
7. Start the third row with the plank cut at appropriate length. Again the remaining piece can be used at the opposite end of the row, if the layout of the room permits.
8. Continue this pattern for the remainder of the rows to be installed. Always place the cut end of the first plank against the wall.
9. Fitting around irregular objects is not a problem. Simply make a pattern out of heavy paper to fit around pipes or irregular objects. Place the pattern upon the plank and trace. Cut along trace lines using a utility knife or heavy-duty scissors, and lay plank. Be sure to leave a minimum of ¼" expansion space around all fixed objects, floor vents and doorframes.
10. The beauty of SPC FLOORING is the ease of installing the opposite way. You can install from both sides of the plank. This allows you to start in one room and continue through a doorway into another room with the same pattern and continue installing the floor forwards or backwards.
Notes:
1-Inspect the ground before installation, the installation is feasible with the moisture under 40%; it is special ground with the moisture 40%-60% so you should install a little to confirm before mass-installation; and it is unsuitable to install with the moisture over 60%. A way to test the moisture is to flatly place a couple of planks on the ground and see if there is moisture on the back 6-12 hours later.
2-The following situations are beyond the warranty: Minor color, shade or texture variations between samples, printed color photography and the actual material.
MAINTENANCE GUIDE
1. First, sweep and vacuum the floor surface to ensure removal of all loose dust, dirt, and debris. Using a mop (or, for large areas, a floor cleaning machine with a low abrasive pad), scrub the flooring surface. Using warm, clean water, rinse several times or as needed, then use a dry mop or wet vacuum to remove the water and allow drying.
2. Do not allow pets with unclipped nails to damage your SPC FLOORING. It may result in severe scratching to the surface. The same is true for any high-heeled shoes that do not have proper tips on the heels.
3. Avoid exposure to direct sunlight for prolonged periods of time. During peak sunlight hours, use drapes or blinds to minimize the direct sunlight on the SPC FLOORING. Most types of flooring will be affected by continuous strong sunlight. In addition, excessive temperatures are not good for resilient floors. Some natural ventilation or intermittent air conditioning in vacant homes should be considered. Long-term continuous inside temperatures over 38°C combined with strong direct sunlight will damage your SPC FLOORING and cause the installation to fail.
4. Always sweep or vacuum your SPC FLOORING before cleaning so that all loose dirt and particles are removed. For best results don’t use combination cleaner finish products.
5. DO NOT WAX your SPC FLOORING! The surface of floor is very dense and non-porous, which prevents wax from penetrating and thus builds up which can cause yellowing and dirt collection. The same non-porous feature also provides all the protection against wear and staining that you will need. Your Vinyl floor has been designed to be very easy to maintain.
6. If your floor has been exposed to excessive amounts of water due to flooding simply remove the water as quickly as possible. A dehumidifier should be promptly turned on in the room to reduce the moisture levels back to normal. Do not dry the room below the normal moisture level that existed previously.
7. When moving appliances or heavy furniture it is always suggested to use plywood panel on your floor and “walk” the item across it. We also recommend using floor protectors under furniture and placing a walk-off mat at outside entrances to reduce the amount of dirt being brought in to your home.
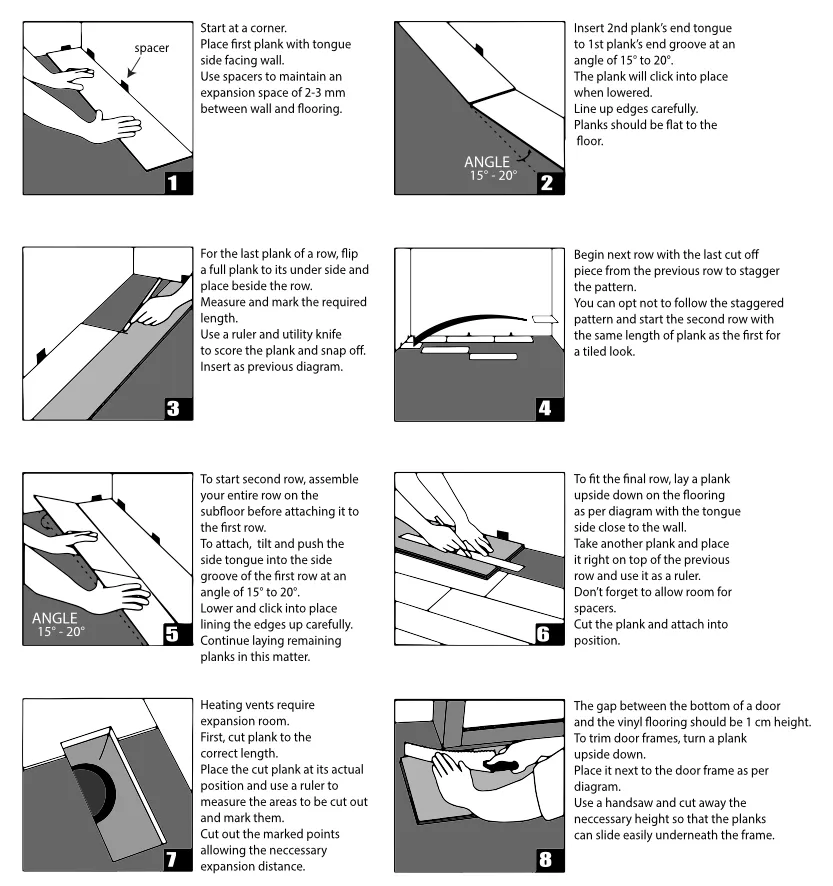
INSTALLATION DIAGRAM TEXT
Diagram 1
Start at a corner.
Place first plank with tongue side facing wall.
Use spacers to maintain an expansion space of 2-3 mm between wall and flooring.
Label: spacer
Diagram 2
Insert 2nd plank’s end tongue to 1st plank’s end groove at an angle of 15° to 20°.
The plank will click into place when lowered.
Line up edges carefully.
Planks should be flat to the floor.
Label: ANGLE 15°-20°
Diagram 3
For the last plank of a row, flip a full plank to its under side and place beside the row.
Measure and mark the required length.
Use a ruler and utility knife to score the plank and snap off.
Insert as previous diagram.
Diagram 4
Begin next row with the last cut off piece from the previous row to stagger the pattern.
You can opt not to follow the staggered pattern and start the second row with the same length of plank as the first for a tiled look.
Diagram 5
To start second row, assemble your entire row on the subfloor before attaching it to the first row.
To attach, tilt and push the side tongue into the side groove of the first row at an angle of 15° to 20°.
Lower and click into place lining the edges up carefully.
Continue laying remaining planks in this matter.
Label: ANGLE 15°-20°
Diagram 6
To fit the final row, lay a plank upside down on the flooring as per diagram with the tongue side close to the wall.
Take another plank and place it right on top of the previous row and use it as a ruler.
Don’t forget to allow room for spacers.
Cut the plank and attach into position.
Diagram 7
Heating vents require expansion room.
First, cut plank to the correct length.
Place the cut plank at its actual position and use a ruler to measure the areas to be cut out and mark them.
Cut out the marked points allowing the necessary expansion distance.
Diagram 8
The gap between the bottom of a door and the vinyl flooring should be 1 cm height.
To trim door frames, turn a plank upside down.
Place it next to the door frame as per diagram.
Use a handsaw and cut away the necessary height so that the planks can slide easily underneath the frame.









Copyright ©️ 2026 Mango Flooring. All rights reserved.