
INSTALLATION GUIDE
MANGO LAMINATE FLOORING

Before you begin installation, please read all notes and instructions carefully.
Inspect all material carefully for color, finish, sheen and defects PRIOR to installation. Material with visible defects found after installation are not covered under warranty. Installation implies acceptance of the quality, dimensions, and appearance of the flooring. If you are not satisfied with your flooring, please contact our customer support team and do not install until concerns have been addressed and you are satisfied with your flooring.
THINGS TO NOTE
• This flooring is intended for indoor use only.
• Because your flooring has been stored in a warehouse and potentially shipped in a semi-trailer truck, we recommend a 48-hour acclimation period for both residential and commercial installation to allow the floor to sit and be brought up to normal living conditions.
• Laminate flooring can be heavier than expected. Always use proper lifting techniques with handling. Whenever possible, use material handling equipment and/or have assistance from shipping and handling professionals.
• Store product boxes flat and ensure they are fully supported during shipping, handling, and storage. Rough handling can cause damage to the flooring prior to installation. Always use proper lifting techniques with handling. Whenever possible, use material handling equipment and/or have assistance from shipping and handling personnel.
• Samples are designed to be a representation of the actual product. Samples under varying light sources including sunlight and room lighting may result in a difference of appearance of the flooring under each condition. We always recommend ordering a sample and assessing it in the space of intended use by laying the sample flat on the floor under various light settings. Prior to installation, inspect your material in daylight for visible faults / damage, including defects or discrepancies in color or shine; check the edges of the flooring for straightness and any damage. No claims on surface defects will be accepted after installation.
• While our waterproof laminate flooring is a 100% waterproof material, it is not meant to act as a moisture barrier for the home. It is best practice to test for moisture and take action promptly and accordingly.
• Avoid direct sunlight exposure to minimize the effects of fading of the flooring. Prolonged UV exposure will likely have a uniform fading effect on building materials.
• Every application and installation is different, therefore we strongly recommend the customer consult a licensed installer/contractor to verify that the conditions and application meet local requirements or industry expectations.
• Any installation guidelines are not intended to supersede federal, state, or local regulations which may require modifying the existing installation, materials or structural components. The owner assumes responsibility for compliance with all building codes, including maintaining the required distance from heat sources such as fireplaces.
• All wood based products, even those specifically designed to have increased resistance to moisture, are hydroscopic (they will react to moisture in the environment) and as result will expand or contract accordingly. All sources of floor moisture must be rectified prior to the installation of the floor. Any construction dampness must be completely dry. This product has a pre-attached underlayment. Do not install over carpet or any additional underlayment (except a poly-film moisture barrier over concrete). Do not use any additional underlayment in commercial applications (e.g. commercial foyers, restaurants, etc. or any areas with heavy rolling loads).
PRE-INSTALLATION PROCEDURES
• Plan an extra 10% of flooring for waste
• Ensure the room temperature is between 60-78° F (18-25° C) and relative humidity levels are between 35%-70% at 65-78° F (18-25° C) during installation, and if required, during acclimation. In most residential environments, this product can be installed immediately and does not need to be acclimated. If acclimation is required (if the relative humidity is below 35% or above 70%, acclimate the product for a minimum of 24 hours by opening up the short ends of the boxes and allowing the flooring to sit and be brought up to temperature.
• For floating installations, provide expansion gaps in areas exceeding 2,000 ft² (185 m²) or continuous runs longer than 43 ft (13 m) in any direction. Always include expansion joints at doorways, between separate rooms, and in long, narrow spaces. Use T-moldings or other suitable profiles to cover all expansion gaps.
• Undercut door frames and casings to allow the flooring to slide underneath. Maintain approximately 3/8" (10 mm) clearance beneath doors. Install the long side first, then tap the short side into place.
• Do not install cabinets, islands, or any fixed objects on top of the flooring. Maintain proper expansion space of 3/8" (10 mm) around all vertical structures. Use appliance glides when moving heavy items and do not drag refrigerators, ranges, or other heavy fixtures across the floor.
• Inspect your subfloor before you begin. Subfloors must be clean and level within 3/16” over 10’ (5mm over 3 m) or 1/8” over 6’ (3mm over 2 m). Concrete floors must be dry, with a maximum moisture content of 2.5% (CM method).
• With a floating floor, you must always ensure you leave a ½” (1cm) gap between walls and fixtures such as pipes and pillars, stairs, etc. Tip: when installing around pipes, drill the holes ¾” (20mm) larger than the diameter of the pipes.
• A moisture vapor barrier must be laid down over concrete substrates. In the case installation is done over a wood substrate on or below grade, a moisture vapor barrier must be laid down if there is not a vapor barrier existing in a well-ventilated crawl space. A minimum 6 mil (0.15mm) 100% virgin, non-recycled polyethylene film must be used as a moisture barrier.
• It is recommended to install the length direction of the planks parallel to the main light direction.
• Do not nail or screw anything through floated floors. Wall moldings and transition accessories cannot be fastened to the planks.
• Lay out the flooring, mixing boards from 2-3 boxes to minimize color and pattern repetition PRIOR to installation.
• Measure the area to be installed: the board width of the last row should not be less than 2” (50mm). If so, adjust the width of the first row to be installed. When measuring, take the expansion gap requirement of about 3/8” (10mm) of the floor perimeter into account. In narrow hallways, install the floor parallel to the longest dimension.
• Flooring should always be the final step in a renovation project. No other trade work should be occurring at the time of flooring installation. Doing so may affect interior conditions. Only install flooring after the jobsite has been thoroughly cleaned and subfloor completely dry and flat to avoid damage during installation.
IN-FLOOR RADIANT HEAT
Warning: Electric heating mats that are not embedded into the subfloor are not recommended for use underneath the flooring. Using electric heating mats that are not embedded and applied directly underneath the flooring will void the warranty.
• Flooring can be installed over 1/2" (12mm) embedded radiant heat. Radiant heat systems must have a minimum of 1/2” (12mm) separation from the product. Maximum operating temperature should never exceed 85°F (30°C). Use of an in-floor temperature sensor is recommended to avoid overheating.
• Before installing over newly constructed radiant heat systems, operate the system at maximum capacity to force any residual moisture from the cementitious topping of the radiant heat system. The maximum moisture content should be 2.5% (CM method). Before starting the installation, turn the heat off for 24 hours before, during and 24 hours after installation.
• Make sure that the temperature in the room is between 60°F (15°C) and 80°F (25°C) during installation.
• Once the installation has been completed, the heating system should be turned on and increased gradually (5 degree increments) until returning to normal operating conditions.
• Refer to the radiant heat system’s manufacturer recommendations for additional guidance.
TOOLS REQUIRED
• Spacers
• Saw (Hand Saw or Jigsaw)
• Adhesive Tape
• Minimum 2MM EVA UNDERLAYMENT
• Rubber Mallet
• Ruler
• Pencil
• Tape Measure
• Utility Knife
• Pull Bar
*If cutting with a jig saw, the laminate surface should be turned down. If cutting with a hand saw, the laminate surface should be face up.
INSTALLATION GUIDELINES
1. Thoroughly clean the subfloor before you start the installation. If you are installing over a concrete subfloor, a minimum 6 mil (0.15mm) 100% virgin, non-recycled polyethylene film must be used as a moisture barrier. Run the moisture barrier in the same direction as the flooring planks. The barrier should be overlapped ≥8” and taped.
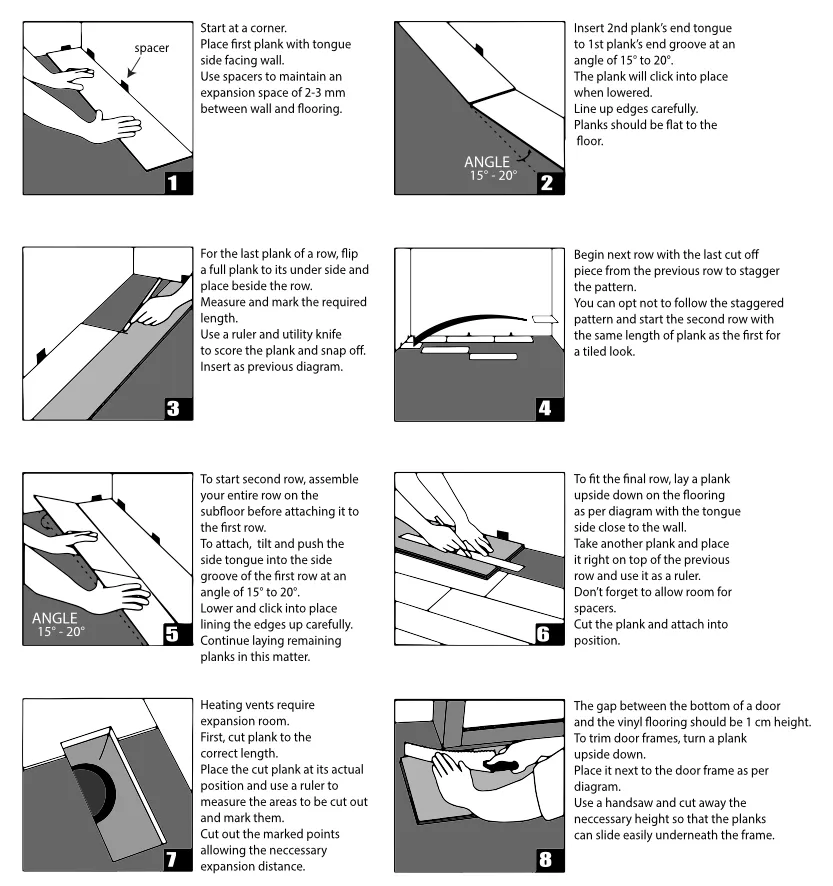
2. Begin laying in the left-hand corner. Place the plank 1/2" (10mm) from the left wall with the tongue side of the plank facing the wall. Use spacers between the wall and the plank. First row, second plank: Insert the end tongue on the short side of the second plank into the end groove of the first one and rotate downward to assemble. Make sure both planks are perfectly aligned. NOTE: If you notice both planks aren’t at the same height or are not well locked together, disassemble and check if any debris stuck inside the lock is obstructing. To disassemble, separate the whole row by lifting it up delicately at an angle. To separate individual plank end joints within a row, rotate the plank upward to disassemble.
3. First row, last plank: At the end of the first row, leave an expansion gap of 3/8" (10mm) to the wall and measure the length of the last plank to fit. Insert the short side and tap it closed, using a pull bar.
4. Start the second row with the leftover cut part of the last plank of the previous row. This small plank should measure at least 12" (30cm). Otherwise, use another plank that should be cut in two. Short pieces should be cut to at least 12" (30cm).
5. Main Method: At a slight angle, click the long side of the first plank in each row into the previous row and slide it against the spacer on the wall on the left. Place a spacer under the plank to keep the plank
lifted at a slight angle to install the next plank in the row. Place the short end of the plank at an angle against the short side of the previously installed floorboard and fold down. Slide down the long side of the board into the locking groove of the adjacent floorboard in the previous row. When the whole row is complete, remove the spacers and fold the row down. Use a tapping block to gently tap along the long side until the joint is closed tightly.
6. After 2-3 rows. Adjust the distance to the front wall by leaving an expansion gap of 3/8" (10mm). Always ensure that the end joints are staggered at least 12" (30cm) from one row to the next.
7. To lay the last row: position a loose board exactly on top of the last row installed. Place another board on top, with the tongue side touching the wall. Draw a line along the edge of this boards, to mark the first board. Cut along the edge of this board to mark the first board. Cut along this line to obtain the required width. Install the long side tongue into the groove with the end joint aligned. Using a pull bar and hammer, work evenly along the length of the plank and lightly tap the joint closed.
8. Holes for pipes: measure the diameter of the pipe and drill a hole that is 7/8" (20mm) larger into the plank. Saw the plank into two pieces perpendicular to the length and bisecting the previously drilled hole. Then lay the two pieces in place around the pipe.
9. Door molding and skirting: lay a board (with the decorative side down) next to the door molding and as shown in the figure. Then slide the floorboard under molding.
10. For bathrooms, laundry rooms, mudrooms, kitchens with exterior doors, entryways, and other wet areas: seal all cut planks and perimeter expansion spaces to ensure waterproof performance. Do not install flooring inside showers, saunas, or steam rooms. After installation, fill all expansion gaps with 3/8" compressible PE foam backer rod and cover with 100% silicone sealant. Do not use acrylic or latex sealants. Apply sealant around all fixed objects such as islands, doorways, and columns. Wipe up spills and standing water immediately; do not allow water to remain on the floor.
CAUTION - WOOD DUST: The International Agency for Research on Cancer (IARC) has classified wood dust as a natural carcinogen. Sawing, sanding, and/or machining wood products can produce wood dust that can cause respiratory, eye, and skin irritations. Equipment should include a dust collector to reduce wood dust in the air. Sweep or vacuum dust for recovery or disposal. Wear a designated dust mask to reduce exposure to wood dust. Avoid dust contact with eyes and skin.
Wear gloves and safety glasses when handling and machining the product. In case of irritation, flush eyes or skin with water for at least 15 minutes. If other side effects occur, request medical assistance immediately.









Copyright ©️ 2026 Mango Flooring. All rights reserved.